

During the first half of my final year of study, my classmates and I were tasked to work together on a game project. I am going to talk more in depth about this project on a later post, during its postmortem.
My most important task during this project was to create a graphics engine using the Vulkan API.
Before beggining this project, I had no knowledge of how Vulkan worked, but I did have some experience with working with OpenGL. My biggest hurdle was then to understand the Vulkan architecture through an OpenGL background.
Trying to understand it through comparison with OpenGL was, however, not a great idea, becauce both of these APIs have very different architectures and features that sometimes does not have a good 1:1 equivalent, making it difficult to learn it that way.
At this point, I though it would just be better to experiment than trying to wrap my head around all of the different concept introduced in Vulkan. Thankfully, there is a great tutorial made by Alexander Overvoorde that helps grasping the different elements of this API. I’m only gonna focus on the outlines of the creation process, if you need more details you can check his tutorial. The steps I took may be a bit different from him, but that’s because I had to adapt certain sections to be able to switch cleanly between OpenGL and Vulkan, and to respect the already existing architecture of the engine.
The first step into creating a Vulkan engine is to first create its environment. While in OpenGL this would be a trivial task, Vulkan asks a lot more out of you.
Firstly, you’ll need to create a VkInstance, an object that links your application to the Vulkan library. This part is quite easy and only asks you to write some static piece of code, but it still quite verbose.
// Provides the app information, this can be anything as long as the format is correct
VkApplicationInfo appInfo {};
appInfo.sType              = VK_STRUCTURE_TYPE_APPLICATION_INFO;
appInfo.pApplicationName   = "Vulkan Application";
appInfo.applicationVersion = VK_MAKE_VERSION(0, 1, 0);
appInfo.pEngineName        = "Neko Engine";
appInfo.engineVersion      = VK_MAKE_VERSION(1, 0, 0);
appInfo.apiVersion         = VK_API_VERSION_1_0;

// Required to create the instance
VkInstanceCreateInfo createInfo {};
createInfo.sType            = VK_STRUCTURE_TYPE_INSTANCE_CREATE_INFO;
createInfo.pApplicationInfo = &appInfo;

// Get the instance extensions and check if they are supported
std::vector<const char*> extensions = GetRequiredInstanceExtensions();
createInfo.enabledExtensionCount    = static_cast<std::uint32_t>(extensions.size());
createInfo.ppEnabledExtensionNames  = extensions.data();
I am using SDL2, so in GetRequiredInstanceExtensions(), I call SDL_Vulkan_GetInstanceExtensions() and then check whether the required extensions are present. I will not go into details, but I also create the debug messenger at this step, allowing the use of the amazing validation layers, which makes debugging much, much easier than in OpenGL.
The next step is to create the VkSurface, to allow Vulkan to interact with the window. To do that I only had to use SDL_Vulkan_CreateSurface(&window, instance, &surface) and provide it with the window and instance, which we both created prior to this.
Next up is the VkPhysicalDevice, which represents the GPU itself. Normally, I would have created it before the VkSurface, but for reasons I do not remember this is how I did it. Anyway, first thing to set up the VkPhysicalDevice is to list all of available GPUs with vkEnumeratePhysicalDevices() and then check their suitability. This step isn’t anything special, so I’m gonna skip a bit to the setup of the Queue Famillies.
Queue Famillies famillies also exist in OpenGL, but you’ll propably never encounter them unless you’re doing some very low level programming. In Vulkan, however, you’ll need to manually retrieve them from the VkPhysicalDevice. Queues are objects which holds all of the commands you submit and then execute them in order. There are multiple Queue Famillies that exist, but for our purposes we will only use the Graphics and Present Queue Famillies. The Graphics Familly will handle all of the drawing commands, and the Present Familly is responsible for handling the presentation of the image on the screen. To retrieve the necessary queue famillies, you’d need to use vkGetPhysicalDeviceQueueFamilyProperties(), then check the type of the familly, and store their indices in a simple struct like this one:
struct QueueFamilyIndices
{
	std::uint32_t graphicsFamily = INVALID_INDEX;
	std::uint32_t presentFamily  = INVALID_INDEX;

	bool IsComplete() const
	{
		return graphicsFamily != INVALID_INDEX && presentFamily != INVALID_INDEX;
	}
};
Note that it’s very common for the Graphics and Present Familly to be one and the same, there’s isn’t any problem with that, and you can choose to consider them as one or as two seperate Famillies.
Lastly, it’s time to create the VkDevice, or logical device. It’s acts as an interface to the VkPhysicalDevice, and while be used in a lot of places in our engine, so make sure you have easy access to it. Before creating the VkDevice, we need to provide it with the queue information we retrieved earlier, so that it can create the queues that we need. We first create as many VkDeviceQueueCreateInfo as queues that we have, also taking into account the case where the Graphics Familly is the same as the Present Familly. We then provide those structs to a VkDeviceCreateInfo struct, that we give to vkCreateDevice() to create the VkDevice. After that, we also need to retrieve the created queues with vkGetDeviceQueue.
And with that, we’re done setting up the basic Vulkan environment, but we’re still, sadly, far from done.
Now it’s time to create the VkSwapchain. If you know what double buffering is, that’s basically the role of the VkSwapchain, it is responsible for storing and presenting the images on the window. This part is already done for you in OpenGL, but in Vulkan you must explicitly create it, but it also allows you much bigger control over how the images are presented.
Creating the swapchain requires quite a bit of work, that I’m not gonna get in much detail, but most of it is just checking and choosing which parameters to use for the swapchain and how many images you want in the buffer. You can then retrieve the images using vkGetSwapchainImagesKHR() which returns an array of VkImage, however, to use any VkImage we also need a VkImageView telling us the values of the different parameters, like its format or number of channels.
At this point, the window will display correctly, but in order to draw anything we will need to setup the whole graphics pipeline by ourselves.
If you’ve worked with OpenGL, you probably know what’s going on at this stage, but you’ve probably never had to set it up yourself. This graph shows a simplified version of what’s happening in it:
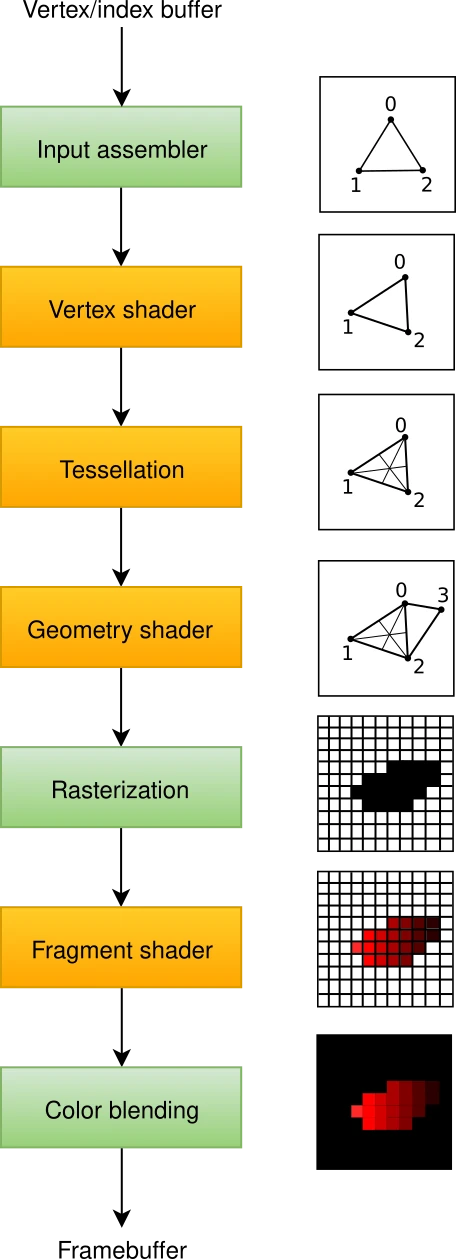
I’m gonna skip over multiple steps during this section, because a lot of it is just creating structs and giving them the values you need on top of not being very interesting, and doesn’t change much between setups unless you need to do some very specific tricks. However, I’m still gonna talk a bit about shaders.
Each pipeline represents one shader and its different stages, which means that you need to create and bind a pipeline for every shader you want to use, I’m gonna go more in depth in my second blog post in how I set the engine up to handle multiple pipelines, but for now let’s stick to just one. For each stage of your shader, similarly to OpenGL, you’d need to create a shader module and bind them to the pipeline.
You’ll probably want to use uniforms in your shaders, to do that you’ll first need to create a VkPipelineLayout which will allow to specify their values.
Next up, we need to tell the program what the image attachments are (color buffer, depthe buffer, etc…), th concept should be quite clear for anyone who know OpenGL, but it’s implementation is quite different.
In OpenGL, you’d specift these informations directly into a framebuffer, but here this information is going straight to a different VkRenderPass object. One restriction this poses, however is that you cannot just disable parameters like depth testing on the fly with commands like glDisable() instead you’ll need to switch to a new Render Pass every time. That is why you can specify multiple subpasses (VkSubpassDescription) when you create the render pass so that you can switch to the one you need when you need it.
Another things we’ll need is to create a VkSubpassDependency for each subpass to tell when the subpass is done rendering its attachments.
We’re getting really close to having something on screen, but we’re still missing some critical objects. Previously we told the render pass of many images we were expecting, but we still haven’t created the framebuffer to put these images in. The VkFramebuffer will contain all of the VkImageView representing the attachments that we created with the VkSwapchain, and we’ll need a VkFrambuffer for each VkImageView.
Another thing we have yet to do is to create some VkCommandBuffer who will contain the commands we send to the GPU. To create a VkCommandBuffer, we will need a VkCommandPool, which will be allocating the space needed for each one of them. Also note that a VkCommandPool works best when it only handles one thread, so be sure to create one for each of your threads if you’re running a multithreaded appplication. You’ll also need one VkCommandBuffer for each VkFrambuffer. A VkCommandBuffer need to be manually told when to start and stop recording, you can so with vkBeginCommandBuffer() and vkEndCommandBuffer().
Finally, we’ll need to actually start the VkRenderPass, you can do that with vkCmdBeginRenderPass(), giving it the VkCommandBuffer of the current VkFramebuffer. Now we’re ready to finally start issuing some drawing commands!
First of, we need to bind the pipeline we’re gonna use with vkCmdBindPipeline(), We can then call vkCmdDraw(). After you’re finished with all of your commands, don’t forget to stop the VkRenderPass with vkCmdEndRenderPass() and then the active VkCommandBuffer.
Don’t expect anything to show up just yet however! We first need to check whether the commands have finished executing before issuing new ones. To do that we’re going to use some VkSemaphore, which will also allow use to retrive the next image from the VkSwapchain with vkAcquireNextImageKHR.
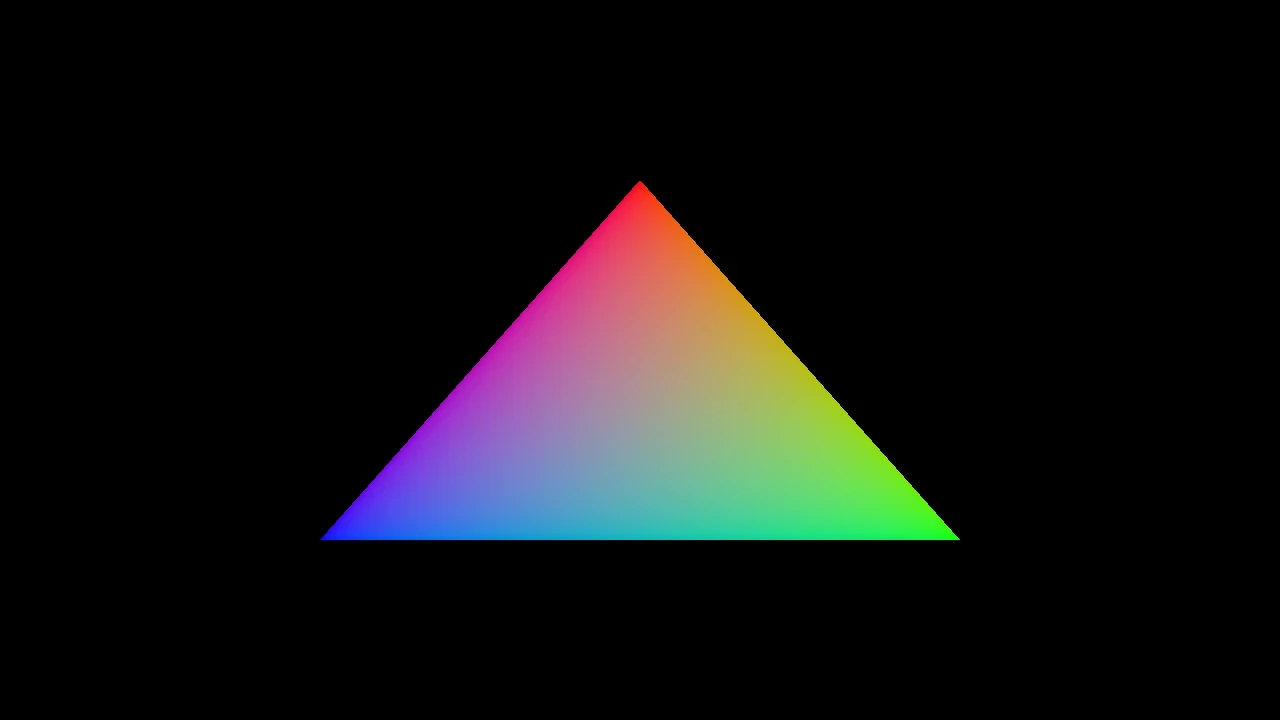
The very last thing (promise!) we need to do now is to submit all of this information to the VkQueue using vkQueueSubmit(). With that, we then only need to call vkQueuePresentKHR() and:
Creating only this basic engine was quite a challenging experience, there are so many new concepts introduced in Vulkan that it can be really hard to wrap your head around it, and I’ve only skimmed its surface in this blog post! I’m gonna go a bit more in depth on how to implement it in a game engine in my second blog post.
Coming from an OpenGL background definitely made some things much harder than it should, and the sheer verbosity of the API also made it quite hard to keep track of every single code block.
Vulkan is a very powerful library, and even if its verbosity can be infuriating at times, it also gives a lot of control over what you can do, sometimes making things easier than in OpenGL! Overhaul, I do not think it will replace OpenGL anytime soon, being way too hard to work with on a small scale, but it is becoming more and more common and knowing to use it, even just a bit, will greatly help you in the future.